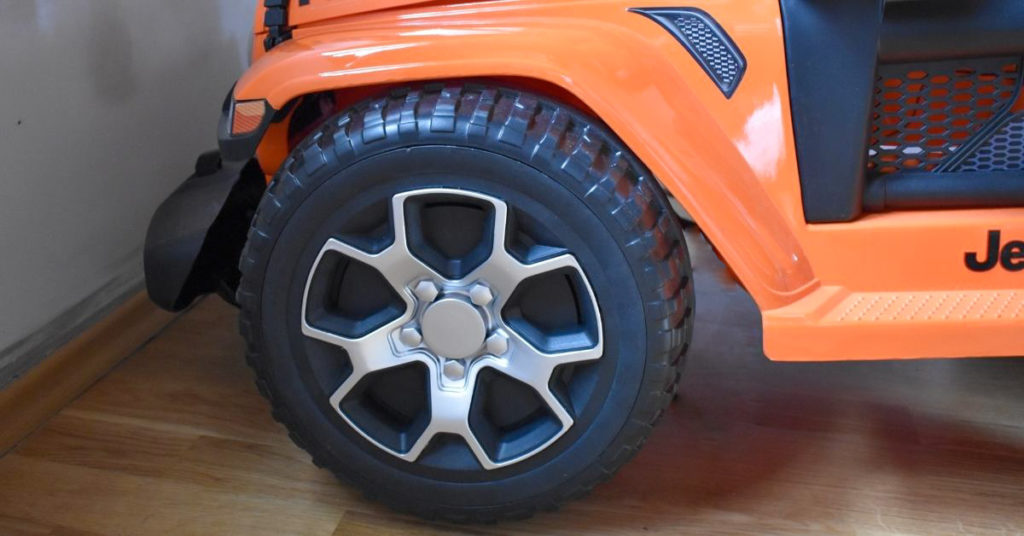
You can lower a Power Wheels to make it look cooler, just like the real car experience. Power Wheels have a good amount of gap between tires and body that can be reduced.
The process is simple. You have to remove the steering, windshield, wheels, and motors. Start working from the front side, modify the frame, go to the rear part, make new holes, and install brackets for extra stability. Install everything back. Your Power Wheels will have a new cool lower look.
Table of Contents
Important Factors to Consider Before Starting to Lower the Power Wheels
- Some Power Wheels models may not have enough space, or some parts may interrupt the lower space.
- For example, if your Power Wheels have 1.5 inches gap between the tire and half, you can remove up to 1.25 inches of the gap; this example is only for the Power Wheels without jumper springs because most of them don’t have it.
- The Power Wheels with jumper springs are usually for the rough terrain and mountainous areas; it is preferred to lift them rather than lowering them. But if you live in a flat area, you can also try that.
- Protective gear is a must while you are modifying the vehicle.
Parts and Tools Required for Lowering the Power Wheels
Parts
- ¾ x ¾ aluminum square tubing
- ¼ x 4 inches long screws four pieces with nuts and ½ inch washers
- 3×3 aluminum L-bracket
- 1/2 inch Screws six pieces
Tools
- Flathead screwdrivers
- Wrenches
- Hacksaw or hand grinder
- Drill
- Protective gear
How to Lower the Power Wheels?
You can lower the Power Wheels by modifying the front and back wheels with a few simple steps. This modification is for the Power Wheels without jumper springs; the measurement may vary, so you have to work according to the measurement; all the other steps are the same.
- Remove the Steering wheel, Seat, and Windshield.
Mostly the steering wheels in Power Wheels have one screw, remove the screw and take the steering out. The steering is taken out because the steering shaft area will be modified.
The seat and windshield are removed because of the safety of these parts. The Power Wheels are flipped for modification, which may break any part. Some Power Wheels may not have a windshield; for taking out the windshield, you may need to open the screws of the dashboard. Take the safety steps first.
- Flip the Power Wheels
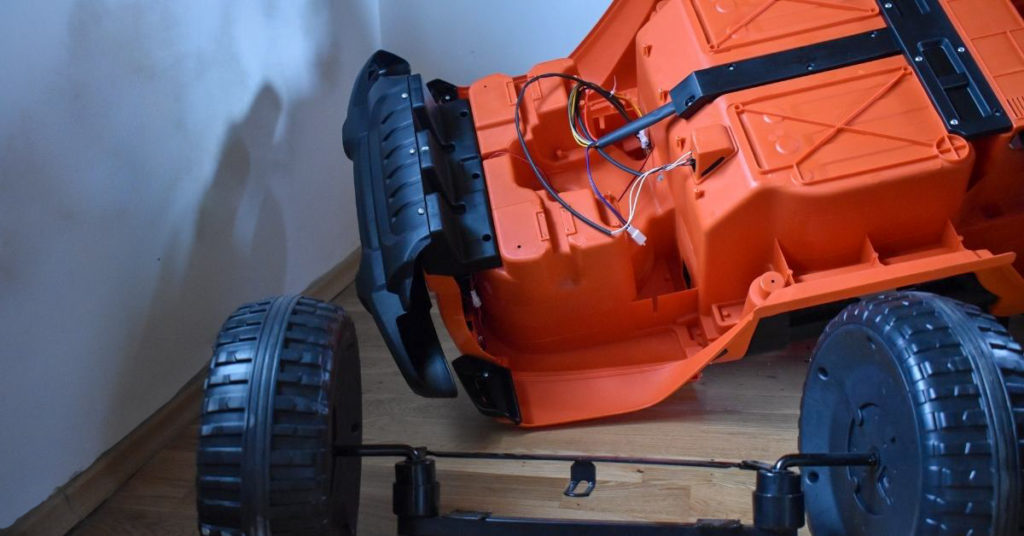
You should have enough area to work on the Power Wheels. Flip the Power Wheels after removing the steering, windshield, and seat. In the board look, you will see that the area at the back tires is all plastic, and the area at the front will have a metal frame that handles the steering operation. The most important thing here is to measure the gap between wheels and the body.
- Remove the Wheels
You have to remove the wheels. Wheels are installed in different ways in different model designs. Mostly you can use a flathead screw or a needle nose to take the wheels out.
- Remove the Modify Frame Holding Steering and Front Wheels.
A metal frame is installed in the front, holding the tires and connected with the steering shaft. This frame is connected to the body with bolts are screws; remove them, and the frame will come out. Make sure that you are removing the correct ones because there may be other bolts and screws.
Four bolts were handling the bolts; after removing the whole should be made bigger to fit ¼ inch screws. This frame will be installed in reverse or flipped. Remove the part from the frame handling the steering shaft; normally, two clips and washers are holding the part; remove them, flip the part, and install the clips and washer again. Now the frame is connected to the steering part in the reverse direction.
- Install the Frame Back With Square Tubing.
Start cutting the square tubing. We need four 2.25 inch pieces. These pieces will make the vehicle 1.25 inches lower as per our experiment, so you don’t need to worry if the wheels are not lowered or lowered too much you can change these pieces to make it work.
With these pieces, you can also lift the vehicle. You can use the hacksaw, hand grinder, or any other tools with what you are comfortable with. These pieces decide the height of your tires, and if it is too low, the wheels may hit the body. We recommend testing the frame by installing the one piece first.
Put these pieces vertically on the holes you have just made bigger. You will use the long screws to screw back the modified frame through these square tubing pieces. The idea is to lift the frame because it is reversed, which will make the wheels lower; we have cut the pieces in a height so the wheels will not touch the body. It may be different for different models.
You need to install the ½ inch washer and lock nuts by flipping the Power Wheels; the place will be under the dashboard near the foot area. Make sure the steering shaft is installed in the frame. Install both front wheels back into the Power Wheels; you will notice that the vehicle is lowered. The front part is finished here.
- Start Working on the Back Part
The back part is relatively easier to modify than the front part. Measure the gape, which will be almost similar to the front wheels. Remove the wheels and remove the gearbox attached to the motor; you need to pull the motor connector out to remove the gearbox and motor completely.
Remove the back wheels shaft after removing the motor. The next step is to make new holes for the shaft, which will be slightly higher than the original one if the Power Wheels are not flipped. Now the Power Wheel is flipped, we will measure from the middle of the previous hole down to 1.25 inches and mark it for both sides.
- Drilling Holes On the Back
The problem with holes on the back is that you can easily drill the holes on both sides by marking, but the shaft will not go through them because there might be plastic walls between them. After all, these wheel places are made like pillars. So you have to make four holes, two on the sides and two into the inner walls.
The problem with inner holes is that you cannot drill them straight because there is no drilling machine. You can tilt the drill and make holes on the inner side; inner holes don’t need to be perfect; you need to pass the shaft from them. The hole size will be slightly bigger than the shaft, but the shaft should be tight in the holes.
- Prepare L-Brackets for Extra Stability
L-Brackets are installed because the rear wheels will need extra stability now. First of all, remove anything from the upper side of wheel pillars so the brackets can balance; you need to use a hacksaw for that; once the extra part is removed, now cut two pieces of two inches from the bracket.
Now place the brackets on the Wheel pillars and mark right where the holes are. You need to make the same size holes in the brackets to pass the shaft. Make three other small holes in the bracket for the half-inch screw, one on the side of the big shaft hole and two on the front side of the bracket.
Once the holes are done, put the shaft back into the vehicle and then put brackets on both sides, don’t forget to screw the brackets with the half-inch pointed screws. Once the brackets are installed, then go for the last step to install the motor and wheels back.
- Install the Motors and Wheels Back
Now the last step is to install the motor and wheels back. Install the motors back just by going reverse in the process of removing them. Installing wheels may get trickier if the wheels are touching the body. You may need to remove some pieces from the body. But we have done it all in measurement, so the wheels should not hit the body, and if it hits the body, you can remove the little piece from that part.
First, test it; if the wheels are not hitting the body, show your kid he will love it.
Cost of Lowering the Power Wheels
The cost of lowering the power wheels is not much and can be afforded by everyone; the main is the skills to use the tools. If you don’t know how to use these tools, you might pay the expert.
The one foot of square tubing cost will be as high as $5, and the brackets are also $5, and the screws, washers, and nuts are $5-$8. The tools you can borrow, or you may have them at home.
Conclusion
Lowering the Power Wheels will look much cooler, and your child will surely love the look. You can do this modification at home as a DIY activity.
You need to arrange some parts and tools and start working by removing the steering and windshield because you need to flip the vehicle. Remove the wheels and start from the front part; you need to modify the front wheel frame to lower the wheels.
You first need to remove the motors for the rear wheels, make new holes slightly higher than the original ones, and install brackets for extra stability. When all the holes are done, install the motors and wheels back. Your Power Wheels will have a new lower look now.


